Few things are as disheartening as reaching for your favorite ceramic mixing bowl, only to discover a fresh crack or a chip. These bowls often hold more than just ingredients; they hold memories of family meals, baking traditions, and cherished moments in the kitchen. The immediate instinct is often to salvage it, to bring it back to life rather than simply discard it. But can a cracked ceramic bowl truly be restored for continued use, especially for food? This comprehensive guide will walk you through various repair methods, address crucial food safety considerations, and delve into the beautiful Japanese art of Kintsugi, helping you decide the best path for your beloved kitchen companion.
Understanding the Risks of a Cracked Ceramic Bowl
Before diving into repair techniques, it’s essential to understand why a cracked ceramic bowl can be problematic, particularly for food preparation. The most immediate concern extends beyond aesthetics. A crack, no matter how hairline, creates an environment where food particles and moisture can become trapped, fostering bacterial growth that is difficult, if not impossible, to clean completely. This poses a significant hygiene risk for any item intended for food contact.
Beyond hygiene, structural integrity is a major concern. Ceramic bowls are often exposed to varying temperatures – from cold ingredients to warm dough, or even hot water during washing. These temperature fluctuations can cause the crack to expand, potentially leading to the bowl breaking further, possibly even shattering unexpectedly. This is especially true for items used with high heat, such as those going into an oven or microwave. If a crack compromises the structural integrity, it’s often advisable to retire the bowl from food use to prevent accidents. In such cases, repurposing the bowl for decorative use or as a planter becomes a safer and more practical alternative.
Choosing the Right Repair Method for Your Ceramic Bowl
When faced with a cracked or broken ceramic bowl, several repair options are available, each with its own benefits and limitations, particularly concerning food safety.
Temporary or Non-Food Contact Repairs
Table is empty.For bowls you intend to use purely for decorative purposes, or for very minor, non-structural chips that won’t contact food, there are simpler repair solutions.
Super Glue (Cyanoacrylate Adhesives): These glues offer a quick fix for small chips or clean breaks. They bond rapidly and are generally easy to use. While some cyanoacrylate glues are technically “food-safe” once cured, having been used for medical purposes, they are typically not durable enough for items that will be repeatedly washed, subjected to heat, or hold liquids. They are also usually not dishwasher safe and may degrade over time when exposed to moisture.
General Purpose Epoxy Adhesives: Two-part epoxy glues create a strong, durable bond for ceramic breaks. They are excellent for structural repairs on decorative items. However, most general-purpose epoxies are not recommended for food contact. They haven’t been tested or certified for food safety, and there’s a risk of chemicals leaching into food, especially with prolonged contact or heat exposure. If you opt for epoxy, ensure it explicitly states “food-safe” and “FDA-approved” on the packaging, though such claims for general epoxies are rare for items used with food and liquids.
Food-Safe Repair Considerations
The primary challenge in repairing a ceramic mixing bowl for continued food use lies in finding an adhesive that is genuinely food-safe, durable, and resistant to washing and temperature changes.
- Look for Explicit Labels: Any adhesive claiming to be food-safe should clearly state it on the packaging. Ideal products would also mention FDA approval or compliance with similar food-contact safety standards.
- Heat and Moisture Resistance: A repaired food-contact item must withstand hot and cold ingredients, as well as washing (often in hot, soapy water). Many “food-safe” claims may not account for these real-world kitchen conditions.
- The “When in Doubt” Rule: If you cannot find a repair method or product that explicitly, reliably, and durably guarantees food safety under typical kitchen use, it is always best to err on the side of caution and repurpose the item for non-food use. No sentimental value is worth compromising your health.
The Art of Kintsugi: Repairing with Gold
Kintsugi (金継ぎ), or “golden joinery,” is the traditional Japanese art of repairing broken pottery by mending the areas of breakage with lacquer dusted or mixed with powdered gold, silver, or platinum. This philosophy treats breakage and repair as part of the object’s history, rather than something to disguise. The repair becomes a beautiful, visible part of the item, highlighting its journey and making it, arguably, more precious.
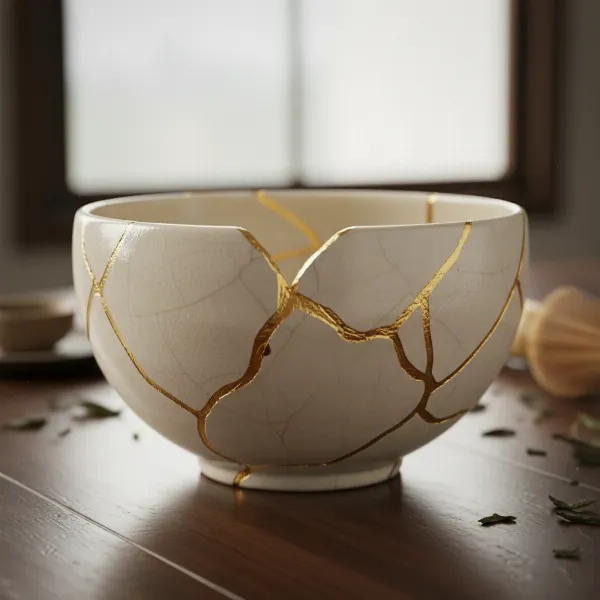 A beautifully repaired ceramic mixing bowl using the Kintsugi method, showing gold lines along the cracks, highlighting the philosophy of embracing imperfections.
Traditional Kintsugi (Urushi Lacquer)
The authentic Kintsugi process uses urushi lacquer, derived from the sap of the lacquer tree. This natural resin is mixed with finely powdered precious metals, usually gold, to fill and seal the cracks.
- Process: The traditional method is a multi-step, time-consuming craft involving careful cleaning, applying layers of urushi lacquer, allowing each layer to cure (often in a humid environment), sanding, and finally dusting with gold powder before a final polish. It’s an art form requiring patience and skill.
- Food Safety: Once fully cured, traditional urushi lacquer is generally considered food-safe. This is a significant advantage over many modern adhesives.
- Care: Despite being food-safe, traditionally repaired Kintsugi items require gentle handwashing and should not be soaked in very hot water. They are typically not microwave or dishwasher safe, especially due to the metallic components which can react with abrasive soaps or microwaves.
- Complexity: Traditional Kintsugi is a highly specialized craft. Achieving a durable, food-safe repair often requires training or the expertise of a professional Kintsugi artist.
Modern Kintsugi Kits (Epoxy-based)
Due to the complexity and cost of traditional urushi Kintsugi, many modern “Kintsugi-style” repair kits have emerged. These kits typically use epoxy-based glues mixed with metallic powders (gold, silver, brass, or mica).
- Process: Modern kits simplify the process significantly, often involving mixing a two-part epoxy with a metallic powder, applying it to the broken pieces, joining them, and allowing it to cure.
- Food Safety Claims: This is where modern Kintsugi kits present a nuanced challenge. Many manufacturers of modern, epoxy-based Kintsugi kits claim their products are food-safe once cured, and some even claim to be dishwasher-proof. However, it’s crucial to approach these claims with caution.
“Only traditional Kintsugi using urushi lacquer is considered food-safe. It’s a natural resin that’s safe once fully cured, but even then, the piece must be hand-washed gently and kept away from heat, acids, and alcohol. Modern ‘Kintsugi-style’ repairs (epoxy with gold or brass powder) are not food-safe, even if they look beautiful.” [cite: 5 (search result 1)] – r/Ceramics community
While some specific bio-based epoxy glues in modern kits claim food safety and dishwasher proofing, many ceramic experts and traditionalists maintain that most epoxy-based repairs, especially those not rigorously tested and certified for food contact under all conditions, should not be used for items that will hold food or liquids. Bacteria can still accumulate in minute imperfections of the repair. - Recommendation: If you choose a modern Kintsugi kit, scrutinize its food safety claims. Look for explicit “food-safe” and “FDA-compliant” certifications, and understand that even if claimed, continuous use with food, hot liquids, or dishwashing may compromise the repair or safety over time. For maximum peace of mind regarding food contact, consider a traditional urushi repair or dedicate your modern Kintsugi piece to decorative purposes.
Step-by-Step Guide to Repairing a Cracked Ceramic Bowl (General Method for Decorative Use)
If you decide your cherished bowl will become a beautiful decorative piece, a general repair using a strong adhesive is quite straightforward.
- Gather Your Materials: You’ll need your cracked ceramic pieces, a strong, clear epoxy adhesive (not necessarily food-safe for decorative use), mixing sticks, a disposable mixing surface, and protective gloves.
- Clean and Dry: Thoroughly clean all broken edges with warm, soapy water to remove any grease or debris. Rinse well and ensure the pieces are completely dry before proceeding.
- Mix the Adhesive: If using a two-part epoxy, follow the manufacturer’s instructions carefully to mix equal parts of the resin and hardener on your disposable surface. Mix thoroughly until consistent.
- Apply Adhesive: Apply a thin, even layer of the mixed adhesive to one of the broken edges. Avoid applying too much, as excess will squeeze out and be harder to clean.
- Join the Pieces: Carefully align the broken pieces and press them together firmly. Hold them in place or use painter’s tape to secure them while the glue sets. For complex breaks, work piece by piece.
- Cure: Allow the adhesive to cure completely according to the product’s instructions (this can take several hours to 24 hours or more). Avoid disturbing the bowl during this time.
- Clean Up: Once cured, gently scrape off any excess dried adhesive with a razor blade or craft knife. For decorative items, you can lightly sand and paint the repair if desired, though the goal here is a functional mend.
Modern Kintsugi Repair Process (with Food Safety Caveat)
For those drawn to the aesthetic of Kintsugi and using a modern kit, here’s a general process, keeping in mind the food safety warnings for epoxy-based repairs.
- Prepare Your Workspace: Lay down newspaper or a protective mat. Gather your Kintsugi kit components: epoxy glue, metallic powder (gold, silver, etc.), mixing sticks, mixing cards, gloves, and a brush.
- Clean the Bowl: Just like any repair, ensure all broken fragments are clean and dry. Use alcohol wipes if necessary to remove any oils.
- Mix Glue and Powder: On a mixing card, dispense a small amount of the epoxy glue. Add a generous pinch of metallic powder and mix thoroughly with a stick until you achieve a consistent, golden paste. Work quickly, as epoxy has a limited working time.
- Apply to Edges: Using a fine brush or mixing stick, apply a thin layer of the golden epoxy mixture to the broken edges of one ceramic piece.
- Assemble: Carefully bring the corresponding broken pieces together, aligning them precisely. Press firmly and hold for a few minutes until the glue begins to set. For multiple breaks, work segment by segment.
- Fill Gaps (Optional): If there are small gaps along the join, you can apply a tiny bit more golden epoxy to fill them, creating a smooth, even golden line.
- Cure: Allow the bowl to cure completely, ideally for at least 24-48 hours, or as per your kit’s instructions. A longer cure time often leads to a stronger bond.
- Polish (Optional): Once fully cured, some kits may suggest gently buffing the golden seams to enhance their shine.
> “The beauty of Kintsugi lies in embracing the damage, transforming flaws into features that tell a story. It’s a reminder that sometimes, broken things can become even more beautiful.” – Akira Tanaka, Master Ceramic Restorer
Comparison Table: Repair Methods for Ceramic Bowls
| Feature | Super Glue | General Epoxy (Non-food) | Traditional Kintsugi (Urushi) | Modern Kintsugi (Epoxy-based) |
|---|---|---|---|---|
| Bond Strength | Medium | High | High | High |
| Food Safety | Limited/No | No (generally) | Yes (cured Urushi) | Varies, often No (caution) |
| Dishwasher Safe | No | No | No | Some kits claim yes (caution) |
| Microwave Safe | No | No | No (due to gold) | No (due to metallic elements) |
| Aesthetic | Invisible/Plain | Invisible/Plain | Celebrates flaw (gold lines) | Celebrates flaw (gold lines) |
| Difficulty | Easy | Medium | High (specialized skill) | Medium (DIY kits available) |
| Cost | Low | Low-Medium | High | Medium |
| Typical Use | Decorative, small chips | Decorative, heavy duty | Sentimental, artistic (food-safe for Urushi) | Sentimental, artistic (caution for food) |
Conclusion
A cracked ceramic mixing bowl doesn’t always spell the end of its journey. Whether you choose a practical repair for decorative use or embrace the profound philosophy of Kintsugi, restoring a beloved item can be a rewarding endeavor. The most critical aspect, especially for items used with food, is to prioritize safety. Always thoroughly research and verify the food-safe claims of any adhesive or repair kit you use. While traditional Kintsugi with natural urushi lacquer offers a genuinely food-safe and beautiful solution, modern epoxy kits may offer an accessible aesthetic repair, but often with caveats regarding food contact. Ultimately, the choice to repair or repurpose allows your cherished bowl to continue its story, perhaps in a new, even more meaningful way. Which treasured ceramic will you mend and give new life to next?
Frequently Asked Questions
Is Super Glue food safe for ceramics?
While cyanoacrylate (super glue) is generally non-toxic once cured and used in some medical applications, it is typically not recommended for repairing ceramic items intended for regular food contact. It’s not usually durable enough for repeated washing, high temperatures, or prolonged exposure to liquids, which can compromise the bond and potentially its safety over time. It is best reserved for decorative repairs or very minor chips that won’t contact food.
Can I put a Kintsugi repaired bowl in the dishwasher or microwave?
No, whether it’s traditional or modern Kintsugi, it is generally advised not to put a repaired bowl in the dishwasher or microwave. Dishwashers use harsh detergents and high temperatures that can erode the repair, while metallic elements (like gold powder) in Kintsugi repairs can react dangerously in a microwave. Handwashing with gentle soap is always recommended.
What is the difference between traditional and modern Kintsugi?
Traditional Kintsugi uses natural urushi lacquer mixed with powdered precious metals (like gold), a laborious process that results in a food-safe repair once fully cured. Modern Kintsugi kits typically use epoxy-based adhesives with metallic powders, offering a more accessible DIY approach. While some modern kits claim food safety, many experts caution against using epoxy-based repairs for food contact, citing potential leaching and durability concerns.
When should I not repair a ceramic bowl for food use?
You should generally avoid repairing a ceramic bowl for food use if the crack is extensive, goes all the way through, or if the bowl will be exposed to high heat (e.g., oven or microwave). Even if an adhesive claims to be food-safe, deep cracks can harbor bacteria that are impossible to clean, and any repair can weaken the bowl, posing a risk of further breakage or shattering during use. In such cases, repurposing the bowl for decorative use is the safest option.