Baking a cake can be a delightful experience, but what happens when your recipe calls for a specific cake pan you don’t own? Don’t let a missing pan dampen your baking spirits! Your trusty Pyrex mixing bowl might just be the versatile solution you need. As an expert with over a decade of hands-on experience in the kitchen, I’m here to guide you through the process of successfully baking a beautiful, delicious cake right inside your Pyrex mixing bowl. It’s a clever hack that opens up new creative possibilities for unique cake shapes, often resulting in a lovely domed top perfect for decorating.

This comprehensive guide will equip you with all the essential knowledge, from understanding Pyrex’s properties to mastering crucial temperature adjustments and ensuring a seamless cake release. Get ready to transform your ordinary mixing bowl into an extraordinary baking vessel, creating stunning cakes with confidence and ease.
Understanding Pyrex: Is It Oven-Safe for Baking?
Before embarking on your baking adventure, it’s paramount to confirm that your Pyrex mixing bowl is indeed oven-safe. Most modern Pyrex glassware is designed to withstand a wide range of temperatures, making it suitable for oven use. However, there are critical considerations to ensure safety and prevent potential breakage.
Typically, Pyrex bowls are oven-safe up to 425°F (220°C). Some specialized borosilicate glass Pyrex products, particularly those from the EU, may even tolerate higher temperatures up to 350°C. The primary concern when baking with glass is “thermal shock.” This occurs when glassware experiences rapid and extreme temperature changes, such as moving a cold bowl directly into a very hot oven or placing a hot bowl on a cold, wet surface. Such abrupt shifts can cause the glass to crack or shatter. Therefore, always allow your bowl to come to room temperature before introducing it to a heated oven, and never place a hot Pyrex dish directly into cold water or onto a cold countertop. Additionally, avoid using Pyrex under the broiler or directly on a stovetop burner, as these can expose the glass to direct, intense heat that exceeds its tolerance. Always consult the specific care instructions or temperature limits provided by your Pyrex manufacturer to be absolutely certain.
The Art of Preparation: Ensuring a Perfect Release
One of the most critical steps when baking a cake in a Pyrex mixing bowl is ensuring the cake releases cleanly after baking. Due to the curved sides and potentially less “non-stick” surface compared to some metal pans, thorough preparation is key. Skimping on this step can lead to a sticky situation and a broken cake.
Start by greasing the interior of your clean, dry Pyrex bowl meticulously. You can use softened butter, shortening, or a neutral cooking oil spray. With butter or shortening, use a paper towel to rub a thin, even layer across the entire inside surface of the bowl, reaching every curve and crevice. Don’t miss any spots! Next, “flour” the bowl by sprinkling a tablespoon or two of all-purpose flour into it. Gently rotate and tap the bowl to coat the greased surface completely with flour. Once coated, invert the bowl and tap out any excess flour. If you’re baking a chocolate cake, consider using cocoa powder instead of flour for this step to maintain a consistent color and flavor. For an extra layer of security, especially for larger or more delicate cakes, cut a circle of parchment paper to fit the bottom of your bowl and place it on top of the greased and floured base. Lightly grease and flour the parchment paper as well. This careful preparation creates a barrier that helps the cake effortlessly slide out once baked and cooled. After pouring your batter, give the bowl a few gentle taps on the countertop to release any trapped air bubbles, ensuring a more even crumb structure in your finished cake.
Temperature & Time: Adjusting Your Recipe for Glass Bakeware
Baking in a glass Pyrex bowl differs from baking in a traditional metal pan because glass conducts and retains heat differently. Metal pans heat up and cool down quickly, while glass heats up more slowly but retains heat for a longer period. This characteristic of glass means your cake will bake faster and can lead to over-browning on the edges or bottom, or even a dry exterior with an undercooked center if not properly adjusted.
The standard expert advice when substituting a glass dish for a metal one is to lower your oven temperature by 25°F (approximately 13°C) from what the recipe typically calls for. For example, if your recipe states 350°F, preheat your oven to 325°F when using a Pyrex bowl. In addition to adjusting the temperature, you might need to increase the baking time slightly, often by an extra 5 to 10 minutes. This lower, slower approach helps ensure more even heat distribution throughout the cake, preventing the edges from cooking too quickly while the center catches up. For very large or dense cakes baked in a deep Pyrex bowl, some bakers even recommend using a heating core or a flower nail placed in the center of the batter to help conduct heat to the middle and promote more even baking. Always rely on visual cues and the toothpick test to determine doneness, rather than strictly adhering to the recipe’s original baking time.
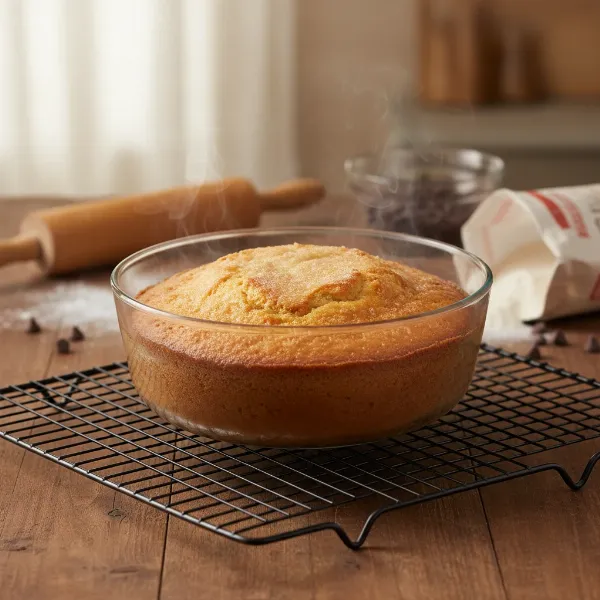 A perfectly baked cake in a Pyrex mixing bowl, ready for cooling on a wire rack
Step-by-Step Guide: Baking Your Cake in a Pyrex Bowl
With your Pyrex bowl prepared and oven adjustments noted, you’re ready to bake a beautifully rounded cake. Follow these steps for a successful bake:
- Preheat Your Oven: Set your oven to the adjusted temperature (25°F lower than your recipe’s recommendation). Allow it to preheat fully before placing your cake inside.
- Prepare the Pyrex Bowl: Thoroughly grease and flour your Pyrex mixing bowl as described in the “Art of Preparation” section. Don’t forget the parchment paper circle for the bottom if you choose.
- Prepare Cake Batter: Mix your cake batter according to your recipe’s instructions.
- Fill the Bowl: Carefully pour the cake batter into the prepared Pyrex bowl. Avoid overfilling; generally, fill the bowl no more than two-thirds full to allow for proper rising without overflowing. Tap the bowl gently on the counter to release air bubbles.
- Bake and Monitor: Place the Pyrex bowl on a baking sheet (for easier handling and to catch any potential overflow, though unlikely if filled correctly) in the center of your preheated oven. Begin checking for doneness a few minutes before the recipe’s original minimum baking time, adding extra minutes as needed.
- Check for Doneness: Insert a wooden skewer or toothpick into the center of the cake. If it comes out clean or with moist crumbs attached, the cake is done. If it’s wet with raw batter, continue baking in 5-7 minute increments.
- Cooling is Key: Once baked, remove the Pyrex bowl from the oven using oven mitts. Allow the cake to cool in the bowl on a wire rack for about 10 to 20 minutes. This cooling period allows the cake to firm up and pull away from the sides of the bowl naturally.
- Gentle Removal: After the initial cooling, run a thin-bladed paring knife or an offset spatula gently around the edges of the cake, between the cake and the bowl. Place a wire rack or a serving plate over the top of the bowl, then carefully and confidently invert the bowl and rack/plate together. The cake should release smoothly onto the rack. If it hesitates, a gentle tap on the bottom of the bowl might help. Remove the parchment paper, if used.
- Complete Cooling: Allow the cake to cool completely on the wire rack before frosting or decorating. Attempting to frost a warm cake will result in melting frosting and a messy finish.
Troubleshooting Common Pyrex Baking Issues
Even with the best intentions, baking in an unconventional vessel like a Pyrex mixing bowl can present a few challenges. Knowing how to troubleshoot these common issues will save you time and frustration.
- Cake Sticking to the Bowl: This is almost always due to insufficient greasing and flouring, or attempting to remove the cake before it has cooled enough in the bowl. Always be meticulous with your bowl preparation, and allow the recommended cooling time for the cake to firm up and contract from the sides.
- Uneven Baking or a Very Domed Top: Glass bakeware, by nature, can sometimes lead to cakes that cook faster on the outside than in the center, causing a pronounced dome or even dry edges with a raw middle. This typically indicates the oven temperature was too high or baking time too short for glass. Ensure you’ve lowered your oven temperature by 25°F and extended the baking time as needed. For larger cakes, a baking nail can help conduct heat to the center.
- Pyrex Cracking or Shattering: This is almost exclusively caused by thermal shock. Never expose a hot Pyrex bowl to cold liquids or surfaces, or a cold bowl to a very hot oven. Always ensure gradual temperature changes and handle hot glassware with care.
- Dry Cake Edges: Overbaking, often a result of not lowering the oven temperature sufficiently, can lead to dry, crusty cake edges. Monitoring your cake closely and using the toothpick test for doneness, rather than relying solely on time, will help prevent this.
> “Baking in a Pyrex bowl offers unique advantages, particularly for creating beautifully rounded cakes, but success hinges on meticulous preparation and careful temperature adjustments.” – Chef Elena Rodriguez, Culinary Arts Instructor
Creative Possibilities: What You Can Do with a Pyrex-Baked Cake
One of the most exciting aspects of baking a cake in a Pyrex mixing bowl is the unique, naturally rounded shape it creates. This domed form is perfect for a variety of creative cake designs that might otherwise require specialized pans or extensive carving.
You can easily use Pyrex-baked cakes to construct impressive sphere cakes for sports balls, planets, or character heads by baking two halves and joining them with frosting. The rounded top also lends itself beautifully to elegant, rustic single-layer presentations, simply frosted and adorned with fresh fruit or flowers. For elaborate multi-tiered creations, the domed top can be leveled off with a serrated knife, providing a stable, flat surface for stacking. The transparency of Pyrex also allows you to visually monitor the cake’s progress as it bakes, adding an element of control to your baking process. Experiment with different bowl sizes to create mini domed cakes or grand, show-stopping centerpieces. Your Pyrex mixing bowl is more than just a tool for combining ingredients; it’s a gateway to imaginative baking!
Conclusion
Baking a cake inside a Pyrex mixing bowl is a fantastic technique for any home baker looking to expand their repertoire or simply make do without a traditional cake pan. By understanding the unique properties of glass bakeware, implementing careful preparation steps like thorough greasing and flouring, and making crucial adjustments to your oven temperature and baking time, you can achieve consistently excellent results. Remember, the keys to success are safety first, precise preparation, and attentive monitoring throughout the baking process.
Your Pyrex mixing bowl, a staple in many kitchens, truly shines as a versatile and resourceful tool, offering both convenience and creative possibilities. Don’t hesitate to embrace this method and delight your family and friends with a perfectly baked, beautifully shaped cake. What will be the first rounded cake you create in your Pyrex bowl?
Frequently Asked Questions
How full should I fill my Pyrex bowl with batter?
Table is empty.It’s generally recommended to fill your Pyrex mixing bowl no more than two-thirds full with cake batter. This allows ample space for the cake to rise during baking without overflowing, which can lead to a messy oven and a potentially deflated cake.
Can I put a cold Pyrex bowl straight into a hot oven?
No, it is strongly advised against placing a cold Pyrex bowl directly into a hot oven. This drastic temperature change can cause thermal shock, leading the glass to crack or shatter. Always allow your Pyrex bowl to come to room temperature before putting it into a preheated oven.
What if my cake burns on the outside but is raw in the middle?
This common issue usually indicates that your oven temperature was too high for baking in glass. Pyrex retains heat more efficiently than metal, so you need to lower the oven temperature by about 25°F (13°C) and increase the baking time slightly to allow the cake to cook evenly through to the center without over-browning the exterior.
Is it always necessary to lower the oven temperature for Pyrex?
While not universally required for every single recipe, lowering the oven temperature by 25°F is a highly recommended best practice when baking cakes in Pyrex or other glass bakeware. It helps mitigate the effects of glass’s heat retention, ensuring a more even bake and preventing overly browned or dry edges.
How long should I let the cake cool in the bowl before removing it?
After baking, allow your cake to cool in the Pyrex bowl on a wire rack for approximately 10 to 20 minutes. This initial cooling period allows the cake structure to set and pull away from the sides of the bowl, making it much easier to invert and remove cleanly without breaking or sticking.